Applying Quantization to Mobile Speech Recognition Models with PyTorch Lightning —
This is the third post in our series on how to improve model inference efficiency (compute, memory, time) through model quantization.
PyTorch Lightning enables you to rapidly train models while not worrying about boilerplate. While this makes training easier, in practice models are not trained for the sake of training models but rather for deploying to production applications.
In the opening post of the series we discussed, model selection and trained a floating-point baseline model for speech command recognition.
In the second post, we looked at the background of quantization.
In this post, we use our insights from part two to quantize the floating-point model of part one.
Reproducing this Code
You can find all code for this tutorial in the accompanying Jupyter notebook. It also contains step-by-step instructions on how to use the Grid platform to train in under an hour with the free credits.
Developed by the creators of PyTorch Lightning, Grid is a platform that enables you to scale training from your laptop to the cloud without having to modify a single line of research code.
This 3-minute video below shows you how to execute code on cloud instances with zero code changes and how to debug/prototype and develop models with multi-GPU cloud instances.
Grid is not a pre-requisite for training the content in this article but it will make training faster and easier to reproduce.
With that let’s get started!
Quantizing a Model with PyTorch Lighting

Now that we understand how quantization and edge deployment work, we can finally learn how to quantize our edge model.
Here is what we will do:
- Choose a quantization backends for our hardware
- Refactor the model code to adapt for gaps in operator coverage
- Refactor the model to allow everything to be stateful
- Explicitly preprocess your model for quantization
- Quantization aware training with PyTorch Lightning
- Validate the Quantized Model
If this seems overwhelming, don’t worry, PyTorch Lightning handles most of this process for us.
I’ve taken the liberty to mark the parts of quantization that PyTorch Lightning currently handles out of the box in the diagram below.
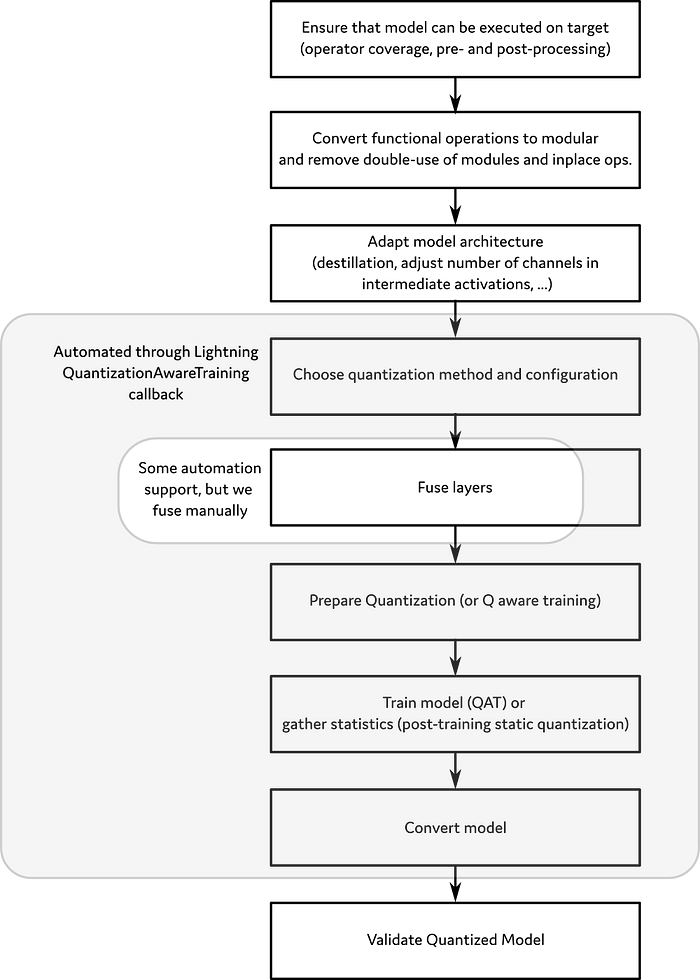
1. Choosing a Quantization Backend for our Hardware
Support for quantization in PyTorch is provided through 3rd party backends. PyTorch currently has two quantization backends to provide support for quantization operations, FBGEMM, and QNNPACK, to handle quantization at runtime. (in addition to some conversion options such as Android’s NNAPI)
- FBGEMM is specific to x86 CPUs and is intended for deployments of quantized models on server CPUs.
- QNNPACK has a range of targets that includes ARM CPUs along with x86.
Since we are deploying to a Raspberry Pi, we will use QNNPACK.
2. Refactoring the Model Code to Adapt for Gaps in Operator Coverage
Since QNNPACK was developed for image processing, it has reasonable coverage for 2D convolution and pooling layers. However, the 1D operations used in our m5 speech recognition model are not supported. This is a great opportunity to contribute if you enjoy low-level work!
Therefore to quantize our model, we will emulate 1D operations with 2d convolutions by adding a Unflatten layer to our model and mapping all the 1D operations (Convolution, BatchNorm, and MaxPool) to their 2D counterparts. The Flatten layer at the end of the convolution layers then removes the unused dimension. In the process, the kernel-size and stride parameters get an additional singleton dimension as well.
After these changes, our new Quantization Ready M5 network looks as follows (the same code is in the Jupyter notebook for this tutorial):

So yay!

This model does exactly the same thing as our unquantized model but now uses 2D operations under the hood.
Note: that emulated 2d layers means that you cannot easily share the pre-trained weights between quantized and unquantized m5 models but this is not a blocker since we can train from scratch anyway.
3. Making our Model Stateful
The quantization observers that collect the statistics of the inputs make all operations and layers stateful.
This requires that:
- Modules such as activations functions should not be reused.
- We should avoid in-place operations such as ReLU with
inplace=True - All Functional expressions (e.g. the addition in
output = input + transformedin residual blocks) need to be converted totorch.nn.quantized.FloatFunctional.
By refactoring the PyTorch example code to use nn.Sequential, we addressed all of these requirements.
4. Explicitly Preprocess the Model for Quantization
Now that we have applied all the code-changes our model needs. The final pre-processing step is to identify which layers need to be fused.
In the last post, we mentioned that one of the bottlenecks in quantizing neural networks is reading from and writing to memory.
So can we enable PyTorch to do less reading and writing?
Yes, we can, by fusing pointwise layers we can fuse the (evaluation-mode) batch norm and ReLU layers to the convolutional layers. Conceptually, this is separate from quantization, however, quantization backends require fused operators.
We just need to tell it which layers to fuse and PyTorch Lightning will handle fusing for us. To do this we a small loop over our sequential to collect the candidate layers for fusing. Our layers_to_fuse is a list of lists that contains the layer names in the usual PyTorch hierarchical indexing.
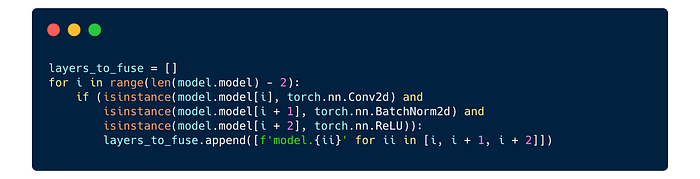
This layers_to_fuse returns the following list that PyTorch Lightning will fuse for us.

Now we are ready to train!
5. Quantization Aware Training with PyTorch Lightning
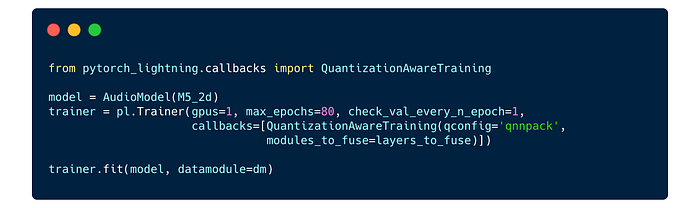
PyTorch Lightning makes quantization aware training sample.
In Lightning the QuantizationAwareTraining callback takes care of the various stages for us we tell it the quantization backend and the list of modules to fuse.
Behind the scenes it will:
- Tell PyTorch about the details of how to quantize including the quantization strategy, quantized dtype, which statistics to base the calibration on, by assigning a
QConfigstructure to our model as a memberqconfig. PyTorch provides reasonable defaults, and PyTorch Lightning will set these for use when we let it know which backend we want. - Fuse the layers we identified for fusing,
- Before training set the various quantization choice details and prepare the model for training by inserting fake quantization points and statistics gathering,
- After training convert it from the QAT model with fake quantization to a properly quantized model.
All this is automatically done for you with lightning.
After training we can export to TorchScript as follows:

Upon running this exported torch script model you may notice a slight glitch with PyTorch.
If we run

We get an elaborate traceback with this error:
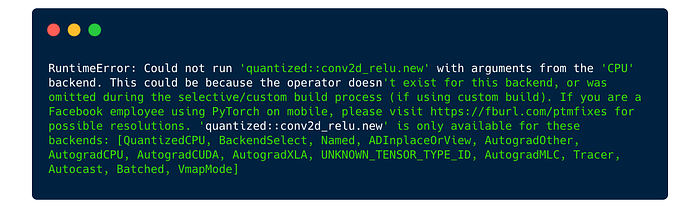
So what does this error message RuntimeError: Could not run 'quantized::conv2d_relu.new' with arguments from the 'CPU' backend. ... 'quantized::conv2d_relu.new' is only available for these backends: [QuantizedCPU,...] mean?
It means that conv2d_relu is only available on the QuantizedCPU backend and our tensor is on the CPU backend, i.e. it is not quantized.
Unfortunately, to_torchscript() “forgets” the quantization and dequantization steps at the beginning and end.
We can work around this glitch by calling the quantization/dequantization explicitly ourselves with the following dequant function :

Now the model will run without any errors.
6. Validating the Quantized Model
One last thing we should do is do a validation run to check our model’s accuracy.
Now we might be tempted to just do

However there is a caveat: These statistics were gathered during the last validation pass in the Quantization Aware Training, so it will return the accuracy of the fake-quantized model instead of the converted torch script model.
Because our trainer runs on the GPU and quantized operators are not (yet) implemented on the GPU, we need to instantiate a new pl.Trainer instance to run the validation.

So our Quantized model looks fine, we are ready to deploy on the Raspberry Pi.
Next Steps
This concludes the third part of our tutorial a reminder that all the code is available here and can be run on grid for free with the community tier credits.
Stay tuned for the final post.
- Analysis, Conclusions, and Next Steps
Acknowledgments
That you could read this blog post until here is entirely due to fantastic editing by Ari Bornstein.
About the Author
Thomas Viehmann is the author of Deep Learning with PyTorch from Manning Publications. With more than 150 features and bug fixes, he is one of the most prolific independent contributors to PyTorch. Through his company MathInf GmbH, he provides quality Machine Learning and PyTorch consultancy and training since 2018. He has a Ph.D. in pen-and-pencil mathematics and blogs at Lernapparat.de.